Friday, January 11, 2013

The Perfect Fabric

It seems like a while since I've written.
December seemed to fly by, between work, and making pj pants for the boys, which could only be worked on during school hours, pj pants for Jeff that could only be worked on after his lunch, and regular housework, some last minute Christmas baking, time seemed to rush by. But that didn't stop me from starting a project.
 Last summer, well, June to be specific, I was in our local thrift shop when I spied a chair that I really wanted.  I had to leave it there, as I didn't have the cash at that moment.  I kept hoping that it would stay for a while.  Later that week,  the boys and I went back and sure enough, it was still there. So, I purchased it.  Getting it home was quite the challenge - I thought I could fit it into the trunk enough that we could drive slowly.  That didn't work.  So I tried to wedge it into the back seat, I almost got it stuck. That didn't work either. (Obviously!)   So, I finally got it unstuck, and stood there, wondering how on earth I was going to get this home.  From behind me, I heard someone ask if I needed help. It was an older man, wondering if he could bring my chair home to me.  He had a truck, and it would fit in the back. I very willingly accepted his help, and he followed me home. Once I had it home, I knew it would go in my living room. However, there was a problem... the colour of the chair itself.  It was a faded lime green velvet fabric, and didn't match my living room at all.  I also didn't really like the tufts - it sure aged it.  
It was also a little banged up, but that didn't matter to me, I knew it what the final outcome would be like, and banged up and dented fit. 
 The chair sat for quite a while in the living room, while I searched high and low at the fabric shop for the right fabric. I checked back every few weeks and nothing, absolutely nothing jumped out and said, "This is the right fabric!" 
Until December.  I was in Fabricland with my Mother in law, and Sister in law and there it was - the perfect fabric. It was exactly what I was looking for. And so, I took it home. 

Despite feeling busy and overwhelmed with all the stuff going on in December, I decided to start on my chair.  Took off the seat and then started on the back. I tell you - there were lots of staples in that back. I think I pulled out over 300 staples. (And in the process, I stabbed myself a few times)

 I saved the foam pieces to reuse, and the old fabric pieces to use as a pattern.
 I don't mind natural wood, but this chair was begging for paint.  And I had just the right colour too! All those little grooves were hard to paint, but using a small artists brush allowed me to get into all the grooves.

 After the paint was dry, I scuffed it up a bit. I love the distressed/aged/chippy look, but I find it hard to get it "right".  This time it just seemed to work exactly right.
 Covering the seat - this piece was probably the easiest piece. 
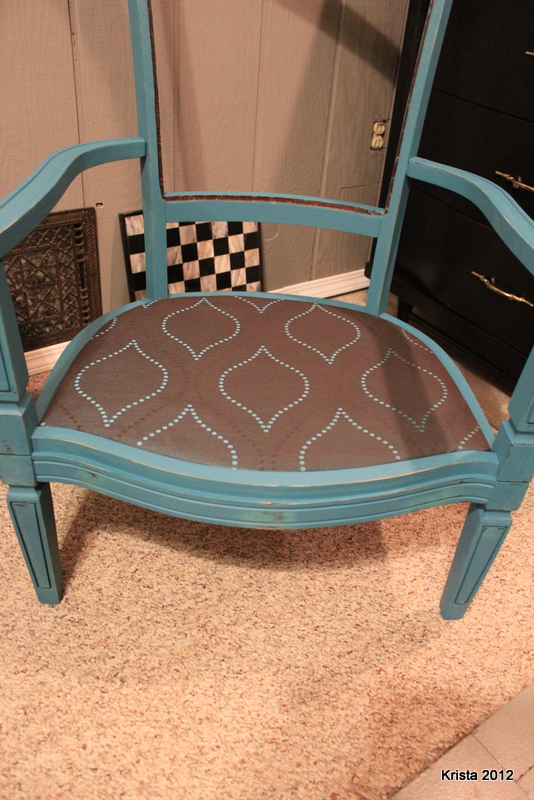
 Seat in place - a good shot of the fabric. It's brown, with teal polka dots, and then darker brown polka dots following the same pattern.
 The back fabric piece in place.
My nemisis... I hate zippers. I've only ever sewn in one zipper and that was back in High School Home Economics class.  And so, the chair stayed unfinished till I could figure out how to finish the last cushion. I finally figured out, that I could ditch the zipper altogether, and just leave an opening to hand stitch shut after the foam was inside the new cover.
 Lots of pins to hold it in place.
 All finished.  As you can see - the back did not get tufted.  I left it smooth. And really love how it looks.  The foam for the back did get replaced.  The original piece was 1.5" thick, the new piece is 2".  It's a little thicker, but I think it will be ok.  The 1" thick foam was too thin, and so you make do with what you have.
 To finish the edge around the back, I hot glued of brown twist in between the fabric and the chair edge.  You can see all the little staple holes from the original upholstery job.

And there it is, my new chair, with the perfect fabric. :)  It was a fun project, and I really enjoyed doing this one.  I'm getting better with the upholstering - which is good because I have one chair left to do, and it has me stumped. 


Friday, November 23, 2012

Deck the Halls

"It's beginning to look a lot like Christmas, every where you go"
I love decorating for Christmas, in fact, I think it's hereditary.  My Mom has had her trees (yes - plural, as in more than one, even more than two!) up since Thanksgiving back in October. I'm not entirely sure if they are decorated yet, but they are up. Guess when you leave for a month of holidays, decorating might wait. But the trees are up!  My youngest sister usually beats me with getting hers up, but I'm not usually far behind. 
This year took a bit longer for me to get it up and decorated. First I had to find a spot for our tree. This hasn't been a problem in the past - it has a perfect spot, but since last Christmas, our living room has acquired a new computer desk for the boys, and a large plant and stand, and another chair. The leg is broken on the love seat, which means it needs to have our wooden storage bench behind it to hold it up... so moving the loveseat wasn't going to happen.  However, I got everything where I thought it needed to go, and I HATED it... the tree looked wrong, the loveseat kept tipping (because I needed to move the bench, so that I could move the loveseat back a bit, so that I could move the couch, so that I could get the tree where I thought I wanted it) Yep, sounds a little bit like "This is the House that Jack built".  However, my version is better. So after moving that all around and getting my tree up (which is a pain as every branch is individually put on!), I hated it.... so it sat, and sat and sat... and the kids begged and begged and begged for me to decorated it (if it hadn't been such a pain to take down, I would have put it away just to see the reactions on their faces when they got home from school)! Mean Mom aren't I?! Anyways... long and short of it - I put the tree where it always goes, and love it there.  But to do that, I needed to move the bench (again), move the plant and stand, and move the love seat. And then drag my huge tree across the living room. I don't have pictures of the mess that I made! Was a little too occupied trying to get it where I wanted it.
So, here is my tree.  Gold, burgundy and clear lights. Looks like I forgot the tree skirt... oh well, it's there now. 
 Even played with my settings and finally figured out how to do a "bokah" shot - love the way the lights look like this.
 Close up - a little over exposed - but I kind of like it. :) 
Can almost read by those lights!
 The next spot I decorated was my antique buffet.  For years, I've had this in my dining room with plants on it, and unable to decorate it. This year, we moved it to the library, and I can finally decorate it.  I knew that it would be the perfect spot for my Nativity.  I don't need to cram it into a little space - can stretch it out a little more.
 The facial expressions that the artist drew onto the people is just incredible.  The wisemen look like they are just full of awe, makes me wonder what they thought as they followed the star, to see the Messiah. What went through their thoughts when they found the tiny child in a humble home, the adopted son of an unimportant carpenter. 
 My most favorite person in my Nativity set is Mary.  According to Scriptures - she was a young girl. And not only was she young, but she was told her Baby would be the Messiah, the Saviour. Born of her, to save her and the rest of mankind. How did she feel, as that tiny baby grew in her womb, what did she do, the first time she felt those soft butterfly kicks inside and knew that was the Son of God kicking her?!  How did she feel when she gazed into his tiny, crying newborn wrinkled face? What did she think when the shephards approached to worship him? When the strangers from away, showed up and worshiped him. Brought gifts that were worth so much more than a poor family could ever imagine.  The look of love and awe that are painted on her face bring me to tears every time I set this set up.
  Next up was my village. Normally, I try to find a big spot to put this were it's not going to get bumped or hit but still visible. For years, it's been on top of  the living room bathroom (ceiling is flat - makes a perfect display area). But this year, I thought of an even better spot... on the floor underneath my antique bench and in some old crates.  I love it.  First of all, I had to fix a few pieces that were victims of a bouncy ball last Christmas. Thankfully, the extreme hold crazy glue I have works wonders.
 I put my woodland stuff into the crates that are beside the bench. One of our new item for this year - is the little triple light lamp post. Crispin picked that one out.
 The rest of the village went under the bench. Far enough back that we can't kick it with our feet when we sit on the bench, but still close enough that we can see it when we walk around.  I'm not liking that I can still see cords, but as I don't have a better way to hide them, I will live with it.
 Finally fixed this little piece.  The little boy on the hobby horse decided to take a spill, so he's all glued back together now too.
 My dancing couple, enjoying a quick twirl, brought on by the musical accompaniment of the children and their instruments.
 The other new purchase was a set of single lamp posts. Cody decided we had to get these ones, as they look like the lamp post from Narnia. So of course we had to get them. Every village needs a Narnian lamp post (and we have two!)
 On of my favorite pieces is the Library building.  I love how the kids are around the table reading a book. And look so excited to see what is in that book. As we are a family of readers - this is perfect. :)
After the village, then I did some garland around the doors, hung some huge decorations in the windows, and strung lights and decorated the kids tree upstairs.  But, I only have pictures of the upstairs. 
It's bright enough up there, that we don't even need to turn on the hall light when we tuck the kids in. There's 300 lights around the door frames, baseboards, roof-line and stairwell.  The kids love it. And as it's mostly the kids that are upstairs - I will put up with the garishly bright multi-coloured lights! (not my favorite, but I do it for the kids)
Next up was a couple of projects inspired by pinterest (whoever made that site was nasty... way to addicting.... but I've sure had fun getting ideas from it.) Will try to post the original pin and then my version...

Project #1
Original
 

My Version


Project #2
Original
 Pinned Image
(couldn't find where the original post)

My Versions

Christmas music has been playing just about non-stop. If I'm not at my computer listening to that play list, then it's going on the tv, loud enough that I can hear it through the house. And if I get tired of that play list, I've got a dozen or more CD's that are waiting.... 

I've got Christmas pictures of the boys as well, but those will wait till I get the cards all out to family and friends. :) 


Well, I think that's all for today.  Enjoy your day.


Wednesday, October 24, 2012

Very Belated Fall Pictures

Sitting at my desk this morning and working, I realized that it's that time of year, where not only do I really miss the summer time colours, but I really miss the fall colours too. All I see are shades of brown, little bits of green, but mostly browns.  Leaves have long since fallen, grass has greened up just a bit, but that's because of the rain that we've had lately, it won't last long and then it will be brown too. I was thinking back to the beautiful September day when Jeff and I had a rare weekday afternoon together, and enjoyed it by going for a walk. 

I took my camera with because the colours were just spectacular. Here's a few of my favorites.
 
Standing on my driveway looking at our trees.
 

Looking down our street.

Sun through the leaves.

Beautiful red tree.

A row of trees by our Church.

Burgundy leaves.

Ornamental crab-apples.

The pond behind the cemetery.

Shades of red.
 
Here's a few of my fall visitors.
 
Mr. Blue Jay

A chubby squirrel.
 
I think it's time to fill the feeder again, doesn't take the greedy little sparrows long to empty it. I think the last time I filled it, it took them less than 24 hours to empty it. 
 
I'm glad I have these pictures to look back on as the colder weather moves in, and I will loose the little bits of green that are left to the white of winter's snow. 

Saturday, September 29, 2012

Finished the Basement

Yesterday, I remembered that it been awhile since I've written on my blog.
I finally, finished cleaning up the basement, and boy does it look so much bigger. 
Remember what it started out as? 
 
Really messy work bench.
Really messy scrap storage
 
 Really messy rest of basement.
 Well, I got to work and in a week and a bit, here's what happened. 
I sorted all the screws and nails and put them in labeled glass jars.
Added some shelves for storage, and found one of the old kitchen cabinets that we saved 
and added it here as well. I hung up my trouble light so it's aiming down at the table instead of at the wall. Added a nail for my tool belt, swept and swept and swept again, and then used the shop vac to
clean the floor and the ceiling. I hate spiders and their webs. Many innocent spiders lost their lives that day. Found my old stereo from Bible School days, dug through the huge box of cables that Jeff had collected and found a cord that fit and worked. So I now have music down here when I'm working. The cardboard pieces did get moved after I took this photo.
 The other side got a good going over. You can see the cardboard behind the printer. The corner where the office chair is, now houses a new shelving unit. On that shelving unit is all the computer stuff Jeff wanted to keep. The chairs are a future project. The wooden office chair will be refinished. The green kids chair will get a better paint job than green with a big red tomato on it. The chair is too wobbly for the kids to use, so it may get put outside in spring with a planter on it. If I can just figure out a way to seal it so if it gets wet, it won't get wrecked.
 My new scrap storage - this made the biggest difference. I got a bunch of big brackets and added them to the wall. All my long trim is up off the floor, my smaller mdf pieces are on shelves. I even made a 2x4 platform for my big pieces of wood and drywall to rest on. You will notice that everything is up off the cement - our basement floods if we get lots of rain, so everything gets off the floor. I want to get the freezer up onto 2x4's yet at some point, but I need stronger people than the boys to help me with that. The drawer is what is left from C2's old built in bed, and on top of that is a few random boxes of left over laminate. Which just might find a new home on the floor of my garden shed. Not sure where else I will use it. There's 1 box and a bit from one floor, and not quite 2 boxes from the other. 2 different colours and thicknesses. So I can't combine them.
So far it's been pretty easy keeping it clean. However, that being said, I actually haven't done any new projects, so that could be why it's still clean. 
My list of things I still want/need to do? I want a black board on the one wall, so I have an area where I can write out my DIY projects, or draw out a sketch of a project that I see in my head and need to figure out how to do it. Besides, I like chalkboards - they're fun. I also want to add some plastic to the ceiling, at least above my work area, so that the cobwebs and dust stay in the ceiling and not on me!